|
Now that we have established our default settings for using Truespace,
we can begin to create the shapes that will make up our model.
|
For now, we'll create just one very simple shape,
a cube. This will be the only object in our model.
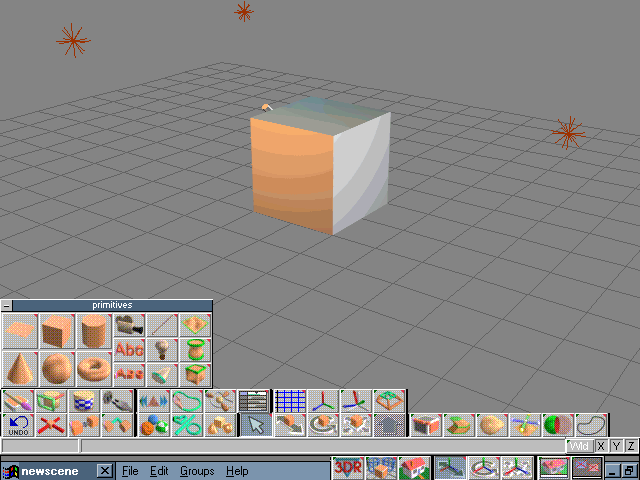
Click on the Primitives icon  and another window will open showing the default shapes that we
can use to create our model. Left click on the cube
and another window will open showing the default shapes that we
can use to create our model. Left click on the cube  ,
and the main window will show the object we selected near the center
of the work area, automatically assigning it a default size and
texture. ,
and the main window will show the object we selected near the center
of the work area, automatically assigning it a default size and
texture.
The next thing we'll have to do is change the
default size to values that will make the object proportional within
the Freespace universe.
|
 |
In the Object info window, you will see the default
values for Location, Rotation, and Size, along with
the name of the current object, and its number of vertices and faces.
Also, there is a checkbox for Dynaunits, along with buttons for
setting the scale of the World and Object coordinates. Note
that the Object coordinate scaling does not have to be the same
as the World scaling. Keep the defaults for Dynaunits, and World and Object
scaling for now.
|

|
Let's change the size of our cube. We'll make
the X value 100.0 centimeters ( 1 meter ), and the Y and Z values
to 50.0. Change them by typing new values into the boxes and pressing
Enter on the keyboard. |
|
Modifying these values changed our cube into a rectangular box.
Look at the pictures above and on the right and you'll see how changing
the size values modified the shape of our model. Since the X size
is larger that the Y size, our model 'points' from the lower left
to the upper right. We'll use this as a reference for the orientation
of the Object axis.
|

Object Axis orientation
|
|

|
Our model is now much smaller than what it was
before. Let's zoom in the display a bit to get a larger view before
we go on.
Then we'll save our model before we begin applying
texturing.
|
|
In the main menu at the bottom of the screen,
click on File, then Scene, and finally Save.
Our model will be saved in the current directory with the file name
newscene.scn. Remember that the Truespace2 demo only saves
*.SCN files.
If you wish to save the file into a different
directory, or save it under a different filename, then select SaveAs...
A standard windows dialog box will pop up and will let you select
the directory and specify a different filename. Make sure the checkbox
marked Ascii is turned off.
Since SaveState was selected in the Preferences
menu, the next time we load our model should return us to this same
view.
|
 |
That's it for creating our model. It wasn't so hard
after all, was it ? Make sure you save your work !
In the next lesson, we will begin to apply our
texturing and make our model 'come alive'.
Lesson 3 - Texturing our model (part 1)
|