|
|
Introduction Getting Started Initial Changes Visual Changes Completing the Project
Introduction Why Another FAQ? This Guide does not cover creating your own Ship models. That's a topic I'm learning myself right now using Caligari's Truespace 3. We'll consider that topic another time. Special Thanks My deepest respect goes out to Volitionites Adam Pletcher, lead artist for FreeSpace 1, and Matt Kresge, FreeSpace 2 modeler. Both have taken time to show me their artwork and, as a result, have been forced to answer my various questions. The more time I put into my attempts to create new ships, the more I truly begin to understand and appreciate their talent and skill. And the more I realize how little I really understood when asking them questions and making "interesting" suggestions that I thought at the time would be simple to do. It's amazing they didn't laugh at my foolishness. :) Questions or Comments?
Getting Started Key Programs
File References
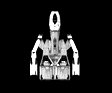
The levels of detail have smaller texture maps and more "blurry" visuals as you progress from a to c. Multiple ship textures are sequentially numbered.
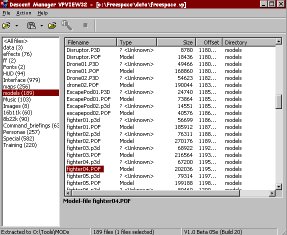
Initial Changes Overview Instead of designing a new model (a whole other topic), we'll use an existing model and make it appear to be different. Changing the ship textures can create the appearance of a completely new ship, even when using the same model. Getting Ready Use VPView32 to open up the FreeSpace.VP file by selecting File -> Open Commercial FreeSpace.VP File -> FreeSpace.VP Main Game Data. First, let's extract a ship model. Click on models (189) to see the 189 files in this virtual data/model directory. Let's work on an Apollo, which is fighter04.pof. Note: The .p3d files were erroneously generated by Volition's 3D Studio Max model converter. They aren't used by the game and weren't intended to be placed on the CD. Right click on fighter04.pof and select Extract to Dir so you can send it to a new folder. Save it in a data folder created specifically for your FreeSpace MODs. Place the file in its own folder, because we don't want to confuse FreeSpace by placing the uncompleted MODs in the FreeSpace/ directory yet. A good place is a new \Working directory.
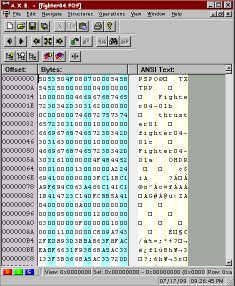
Now let's extract the ship textures. Click on maps (256) to see the 256 files in the virtual data/maps directory. Since we're working on an Apollo, we'll want to extract the three .pcx files that begin with fighter04 (fighter04-01a.pcx, fighter04-01b.pcx, fighter04-02c.pcx). You can select multiple files by using the SHIFT + Left Click, then Right Click and select Extract to Dir to send it to our new \Working directory. We need to have the texture maps in the same folder as the model in order to view the model with the textures in VP-View later. Next, continue the job by extracting the interface files. Select the interface (979) and the files iconfighter04.ani and ssfighter04.ani (the Apollo is fighter 4 in the ships.tbl). Right click and Extract to Dir as the \Working directory. Also click and Extract to Dir the files Loadfighter04.ani and Loadfighter04.pcx. Now let's finish up by extracting the HUD files. Select the HUD (94) and the files shield-f04.ani. Again Extract. Model Renaming First, let's rename the model file. It's a simple Right Click -> Rename function of Windows. Do not add in a space into the file name of any .POF model, as FreeSpace will not be able to read the file. I'll call the model "fighter61.pof" to keep within Volition's guidelines. I would suggest using any name that has the same number of characters, which will become important later when we add in the textures. The second step is the hard part. Open up your renamed model file in the HEX Editor. If you're using AXE, then you'll see something like this:
Search the ANSI Text for references to the texture maps. For the Apollo fighter, we're looking for fighter04-### information. There are no file names and let's change every reference to the base fighter04, just to be sure. In AXE, the command is Edit -> Find and in the PopUp Box we'll choose Type of "ANSI String" and Search for "fighter04". Now, edit the text that refers to the the textures and change them to the name we'll be using for the new textures. I suggest using the same file convention and not changing the number of characters in the file name, which will only cause unnecessary headaches. I chose fighter61, so I'll rename all of the references to "fighter04" to "fighter61". AXE will allow you to just type over the existing ANSI Text. Keep Searching for all references to the file naming convention. You don't want to miss a texture or subcomponent name. Now that all of the changes have been made, File -> Save. There, that wasn't so hard. Was it? Skin Renaming Again, a simple Right Click -> Rename does the job. Be sure to keep the same number of characters in the texture file as well as the "-01a" endings, just like you did in the previous step. I'll call my model textures "fighter61-01a.pcx", "fighter61-01b.pcx" and "fighter61-01c.pcx". Be sure to name the files as you added them into the HEX Editor. Checking Your Work
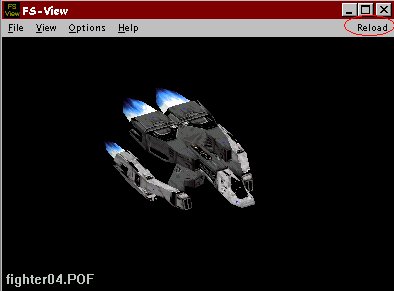
If you changed the texture maps to make them all blue, but you don't see any changes in the model on FS-View even after refreshing then you probably didn't rename all of the texture files and FS-View is looking to the original .VP file textures. All you would need to do is go back into the HEX Editor and search for the Volition-named textures and replace their file name.
Visual Changes Modifying Textures
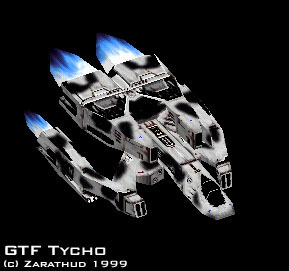
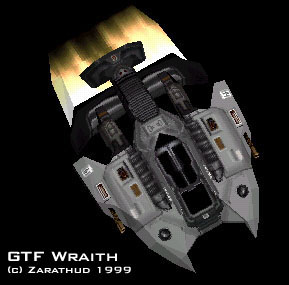
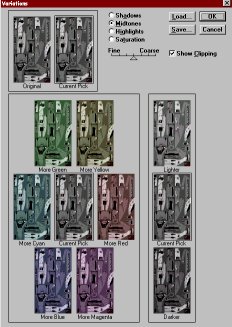
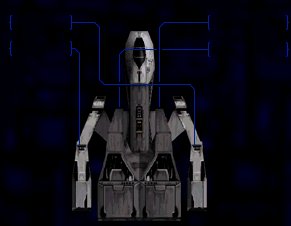
You can see the how the two Apollo fighter variants (GTF Diana and GTF Tycho) look very different with various detailing. The final ship (GTF Wraith) is based on the PVF Thoth model, but creates a very "Terran" feel with a completely new design of the texture. FS-View is a wonderful tool to see how the changes you're making to a 2d texture map will look like when wrapped around the 3d object. Don't underestimate the usefulness of this. Hit that reload button on FS-View regularly. From here, you can go virtually anywhere if you know how to use any of the various paint programs. For the next few sections, we'll walk through a few of my favorite features. Changing Colors One of my favorite features in PhotoShop 3.0 is the Variations tool, which of course only works on RGB images. The Variations tool is buried in the PhotoShop 3.0 menu under Image->Adjust->Variations. This allows you to change the color variations in each image. The options include Shadows, Midtones, Highlights, and Saturation, and allow the addition of more Green, Yellow, Red, Magenta, Blue or Cyan and lighter/darker selections.
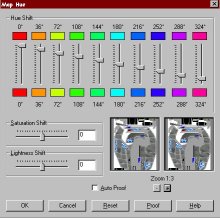
In Paint Shop Pro, a similar tool is called Map Hue. It uses slider bars and can be found under Colors ->Adjust ->Hue Map.
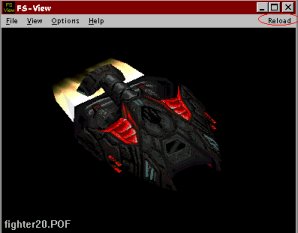
Using these options on a selection inside an image is a great way to match colors or just to change the color of a ship. If you wanted to lighten the Shivan ships because they're too dark to hit, this tool makes it easy. If you wanted to change the color of those Tan Vasudan ships to make them look more Shivan, you can do it with this tool. Your results could look like this:
Borrowing Details There are plenty of games out that permit easy texture modification. I came across some eyes and a female logo on a Starsiege skin that I absolutely loved and could see them sitting on top of a Terran ship in FreeSpace. The changes were easy and once I got started, I would up completely redesigning this texture for a Terran mining vehicle using the Ursa model:
The eyes when placed on top made the "white" vents look like teeth. Along the side, I placed the texture of the woman with a large gun, something I though would be appropriate for a bunch of futuristic miners as a logo. It took a little maneuvering of the logo to make it look right, especially when the image on the other side was covered with a weapons array. Of course, you'll note the name of the mining company "PTMC" as a nod to the original Descent series. A circular hatch I found on another graphic was used to replace the missiles on the bottom (miners don't carry Harbringers anyway). With some tweaks to the remaining features, I soon ended up with a completely new look for the good old Ursa. Some other features I carried over from other Volition textures I extracted to work on later. The Construction tag was just from some .JPEG I found hanging around. Cutting and pasting is a simple enough feature that I believe anyone can do. Start by selecting part of an image using a box selector in your favorite paint program. That's usually the tool that looks like a box with dotted lines: Other features you will need to use are Flip, Mirror, Rotate, Resize, and Scale. None of these selections are too difficult to learn, with a little experimentation. Filling in the Gaps The features you can use to fill in the gaps will depend on your paint program. Most of them have excellent Filter and Plugin programs that you can use to tweak the remaining parts of the texture. In addition, I tend to use Smudge and Blur in PhotoShop and the Color Replacer tool in PaintShop Pro. Experiment a little and you'll discover plenty of ways to adjust and tweak selections in a model to make it look completely different.
Completing the Project Preparing the Loadout Now you just have the ship looking great in FS-View, you want to make sure that it looks good in the Ship Loadout if it's a player flyable ship. Let's go back to those remaining .ani files.
Ship Table Entry You'll need to extract the ships.tbl from the root.vp file. Be sure to decode the file, otherwise you won't be able to edit it. Once the ships.tbl has been decoded, you can edit the file in any text editor -- even MS Notepad. The best way to start a ship modification is to copy the entry of a similar ship (for example, the Apollo we've based our new model on), paste it as a new entry, and then edit the necessary information. Be sure to change the ship table entries $Name, $Short Name, $POF file, $Shield_icon, $Ship_icon, $Ship_anim, $Ship_overhead to correspond with the new images you've edited. Other areas that would be good to edit would be the +Type, +Manueverability, +Armor, +Description, +Tech Description, +Length, +Gun Mounts, and +Missile Banks. These are merely description entries, but after you've put in all this hard work you'll want to share your story behind the new ship. More information about ship editing is contained in a Ship Editing FAQ written by DreAdFaq. Wrapping Up All that's left that can be covered is how to best package your modification for submission to the Descent Chronicles FreeSpace MOD Archive. At the minimum Include your model .pof, texture .pcx, and a readme text file. Please enclose the readme text file (and be sure not to name it readme.txt) which names the ship, describes a little about it, and identifies you as its creator. Unfortunately, I've had situations where the e-mails of the authors, but not the file, has been lost. Other times, someone has tried to claim another person's work as their own...just because they enclosed a readme text file. The file may migrate onto someone's hard drive or may be ripped from our site and posted somewhere else without our site's permission or explanation. You've worked hard on the modification, be sure you get your proper credit in the file itself. It won't guarantee that you credit everywhere, but it will go a long ways toward that end. Also, I would like to encourage everyone to include a sample ships.tbl entry (not the entire ships.tbl file) for your ship. Even if you're not an expert at ship property modifications, a few minutes changing the information I've listed above in the Ship Table Entry will help your idea for the ship take hold. Not everyone will use your exact game properties, but many designers will respect your ship's name and its background information. It will also help avoid the situation where we have ten ships all named the "GTF Pegasus." I would also like to encourage people to create a complete ship pack by creating new .ani or .pcx files for the loadout. These files help keep the immersion and suspension of disbelief necessary for a good modification. Also, missing the different textures for the levels of detail will cause inconsistencies within your ship modification. Once you've started on a project like this, it's a good idea to do as much as you can to complete it properly. That's all I can think of at the moment. Good luck with your ship texture map designs!
|
|
FreeSpace Watch is copyrighted 2000 except where Volition or Interplay may apply. Web design by Colin Czerneda and Todd Miller. |